Artificial Intelligence
Auto-GPT & GPT-Engineer: An In-depth Guide to Today’s Leading AI Agents

When comparing ChatGPT with Autonomous AI agents such as Auto-GPT and GPT-Engineer, a significant difference emerges in the decision-making process. While ChatGPT requires active human involvement to drive the conversation, providing guidance based on user prompts, the planning process is predominantly dependent on human intervention.
Generative AI models like transformers are the State-of-the-Art core technology, driving these autonomous AI agents. These transformers are trained on large datasets, allowing them to simulate complex reasoning and decision-making capabilities.
Open-Source Roots of Autonomous Agents: Auto-GPT and GPT-Engineer
Many of these autonomous AI agents stem from open-source initiatives led by innovative individuals transforming conventional workflows. Rather than just offering suggestions, agents such as Auto-GPT can independently handle tasks, from online shopping to constructing basic apps. OpenAI’s Code Interpreter aims to upgrade ChatGPT from just suggesting ideas to actively solving problems with those ideas.
Both Auto-GPT and GPT-Engineer are equipped with the power of GPT 3.5 and GPT-4. It grasps code logic, combines multiple files, and accelerates the development process.
The crux of Auto-GPT’s functionality lies in its AI agents. These agents are programmed to execute specific tasks, from mundane ones like scheduling to more complex tasks that require strategic decision-making. However, these AI agents operate within the boundaries set by users. By controlling their access via APIs, users can determine the depth and scope of actions the AI can perform.
For instance, if tasked with creating a chat web app integrated with ChatGPT, Auto-GPT autonomously breaks down the goal into actionable steps, like creating an HTML front-end or scripting a Python back-end. While the application autonomously produces these prompts, users can still monitor and modify them. As shown by the creator of AutoGPT @SigGravitas, it is able to build and execute a test program based on Python.
Massive Update for Auto-GPT: Code Execution! 🤖💻
Auto-GPT is now able to write it's own code using #gpt4 and execute python scripts!
This allows it to recursively debug, develop and self-improve… 🤯 👇 pic.twitter.com/GEkMb1LyxV
— Significant Gravitas (@SigGravitas) April 1, 2023
While the below diagram describes a more general architecture of an Autonomous AI agent, it offers valuable insight into the processes behind the scenes.

Autonomous AI Agent Architecture
The process is initiated by verifying the OpenAI API Key and initializing various parameters, including short-term memory and database contents. Once the key data is passed to the Agent, the model interacts with the GPT3.5/GPT4 to retrieve a response. This response is then transformed into a JSON format, which the Agent interprets to execute a variety of functions, like conducting online searches, reading or writing files, or even running code. Auto-GPT employs a pre-trained model to store these responses in a database, and future interactions use this stored information for reference. The loop continues until the task is deemed complete.
Setup Guide for Auto-GPT and GPT-Engineer
Setting up cutting-edge tools like GPT-Engineer and Auto-GPT can streamline your development process. Below is a structured guide to help you install and configure both tools.
Auto-GPT
Setting up Auto-GPT can appear complex, but with the right steps, it becomes straightforward. This guide covers the procedure to set up Auto-GPT and offers insights into its diverse scenarios.
1. Prerequisites:
- Python Environment: Ensure you have Python 3.8 or later installed. You can obtain Python from its official website.
- If you plan to clone repositories, install Git.
- OpenAI API Key: To interact with OpenAI, an API key is necessary. Get the key from your OpenAI account

Open AI API Key Generation
Memory Backend Options: A memory backend serves as a storage mechanism for AutoGPT to access essential data for its operations. AutoGPT employs both short-term and long-term storage capabilities. Pinecone, Milvus, Redis, and others are some options that are available.
2. Setting up your Workspace:
- Create a virtual environment:
python3 -m venv myenv - Activate the environment:
- MacOS or Linux:
source myenv/bin/activate
- MacOS or Linux:
3. Installation:
- Clone the Auto-GPT repository (ensure you have Git installed):
git clone https://github.com/Significant-Gravitas/Auto-GPT.git - To ensure you are working with version 0.2.2 of Auto-GPT, you’ll want to checkout to that particular version:
git checkout stable-0.2.2 - Navigate to the downloaded repository:
cd Auto-GPT - Install the required dependencies:
pip install -r requirements.txt
4. Configuration:
- Locate
.env.templatein the main/Auto-GPTdirectory. Duplicate and rename it to.env - Open
.envand set your OpenAI API Key next toOPENAI_API_KEY= - Similarly, to use Pinecone or other memory backends update the
.envfile with your Pinecone API key and region.
5. Command Line Instructions:
The Auto-GPT offers a rich set of command-line arguments to customize its behavior:
- General Usage:
- Display Help:
python -m autogpt --help - Adjust AI Settings:
python -m autogpt --ai-settings <filename> - Specify a Memory Backend:
python -m autogpt --use-memory <memory-backend>
- Display Help:

AutoGPT in CLI
6. Launching Auto-GPT:
Once configurations are complete, initiate Auto-GPT using:
- Linux or Mac:
./run.sh start - Windows:
.run.bat
Docker Integration (Recommended Setup Approach)
For those looking to containerize Auto-GPT, Docker provides a streamlined approach. However, be mindful that Docker’s initial setup can be slightly intricate. Refer to Docker’s installation guide for assistance.
Proceed by following the steps below to modify the OpenAI API key. Make sure Docker is running in the background. Now go to the main directory of AutoGPT and follow the below steps on your terminal
- Build the Docker image:
docker build -t autogpt . - Now Run:
docker run -it --env-file=./.env -v$PWD/auto_gpt_workspace:/app/auto_gpt_workspace autogpt
With docker-compose:
- Run:
docker-compose run --build --rm auto-gpt - For supplementary customization, you can integrate additional arguments. For instance, to run with both –gpt3only and –continuous:
docker-compose run --rm auto-gpt --gpt3only--continuous - Given the extensive autonomy Auto-GPT possesses in generating content from large data sets, there’s a potential risk of it unintentionally accessing malicious web sources.
To mitigate risks, operate Auto-GPT within a virtual container, like Docker. This ensures that any potentially harmful content stays confined within the virtual space, keeping your external files and system untouched. Alternatively, Windows Sandbox is an option, though it resets after each session, failing to retain its state.
For security, always execute Auto-GPT in a virtual environment, ensuring your system remains insulated from unexpected outputs.
Given all this, there is still a chance that you will not be able to get your desired results. Auto-GPT Users reported recurring issues when trying to write to a file, often encountering failed attempts due to problematic file names. Here is one such error: Auto-GPT (release 0.2.2) doesn't append the text after error "write_to_file returned: Error: File has already been updated
Various solutions to address this have been discussed on the associated GitHub thread for reference.
GPT-Engineer
GPT-Engineer Workflow:
- Prompt Definition: Craft a detailed description of your project using natural language.
- Code Generation: Based on your prompt, GPT-Engineer gets to work, churning out code snippets, functions, or even complete applications.
- Refinement and Optimization: Post-generation, there’s always room for enhancement. Developers can modify the generated code to meet specific requirements, ensuring top-notch quality.
The process of setting up GPT-Engineer has been condensed into an easy-to-follow guide. Here’s a step-by-step breakdown:
1. Preparing the Environment: Before diving in, ensure you have your project directory ready. Open a terminal and run the below command
- Create a new directory named ‘website’:
mkdir website- Move to the directory:
cd website
2. Clone the Repository: git clone https://github.com/AntonOsika/gpt-engineer.git .
3. Navigate & Install Dependencies: Once cloned, switch to the directory cd gpt-engineer and install all necessary dependencies make install
4. Activate Virtual Environment: Depending on your operating system, activate the created virtual environment.
- For macOS/Linux:
source venv/bin/activate
- For Windows, it’s slightly different due to API key setup:
set OPENAI_API_KEY=[your api key]
5. Configuration – API Key Setup: To interact with OpenAI, you’ll need an API key. If you don’t have one yet, sign up on the OpenAI platform, then:
- For macOS/Linux:
export OPENAI_API_KEY=[your api key]
- For Windows (as mentioned earlier):
set OPENAI_API_KEY=[your api key]
6. Project Initialization & Code Generation: GPT-Engineer’s magic starts with the main_prompt file found in the projects folder.
- If you wish to kick off a new project:
cp -r projects/example/ projects/website
Here, replace ‘website’ with your chosen project name.
- Edit the
main_promptfile using a text editor of your choice, penning down your project’s requirements.

- Once you’re satisfied with the prompt run:
gpt-engineer projects/website
Your generated code will reside in the workspace directory within the project folder.
7. Post-Generation: While GPT-Engineer is powerful, it might not always be perfect. Inspect the generated code, make any manual changes if needed, and ensure everything runs smoothly.
Example Run
Prompt:
“I want to develop a basic Streamlit app in Python that visualizes user data through interactive charts. The app should allow users to upload a CSV file, select the type of chart (e.g., bar, pie, line), and dynamically visualize the data. It can use libraries like Pandas for data manipulation and Plotly for visualization.”
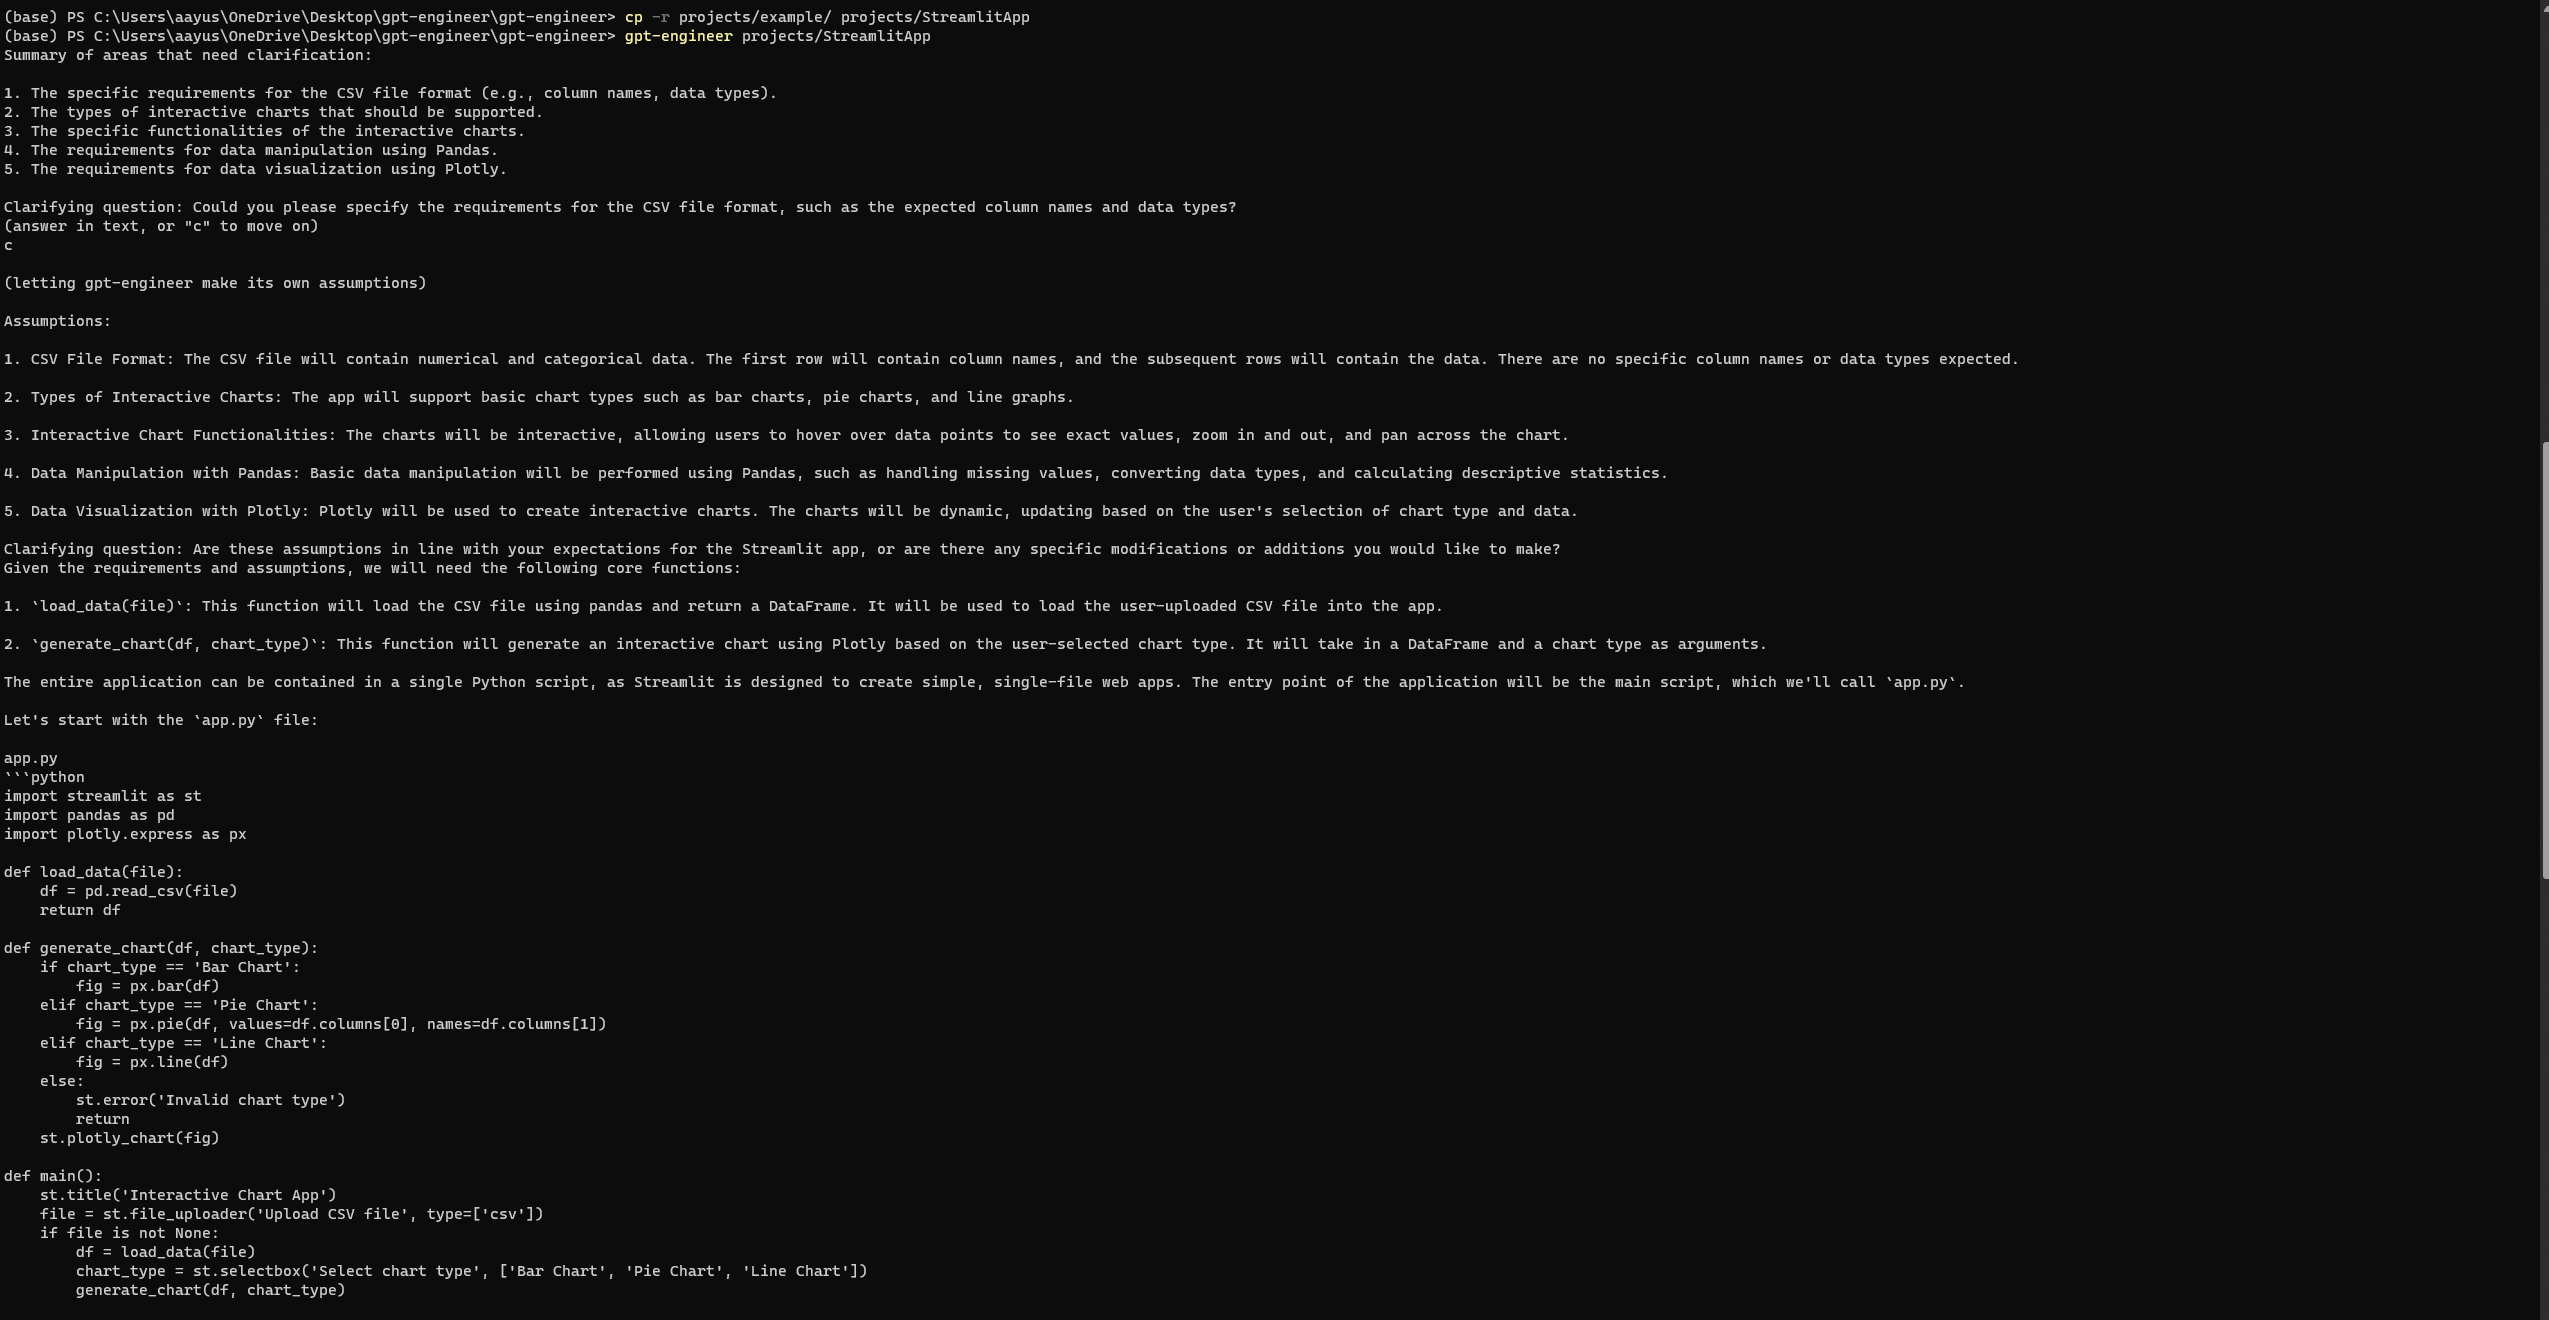
Setting Up and Running GPT-Engineer
Much like Auto-GPT, GPT-Engineer can sometimes encounter errors even after a complete setup. However, on my third attempt, I successfully accessed the following streamlit webpage. Ensure you review any errors on the official GPT-Engineer repository’s issue page.

Streamlit App generated using GPT-Engineer
Current Bottlenecks of AI Agents
Operational Expenses
A single task executed by Auto-GPT might involve numerous steps. Importantly, each of these steps could be billed individually, increasing the costs. Auto-GPT can become trapped in repetitive loops, failing to deliver promised outcomes. Such occurrences compromise its reliability and undermine the investment.
Imagine wanting to create a short essay with Auto-GPT. The essay’s ideal length is 8K tokens, but during the creation process, the model delves into multiple intermediary steps to finalize the content. If you’re using GPT-4 with 8k context length then for the input, you would be billed $0.03. And for the output, the cost would be $0.06. Now, let’s say the model runs into an unforeseen loop, redoing certain parts multiple times. Not only does the process become longer, but each repetition also adds to the cost.
To safeguard against this:
Set usage limits at OpenAI Billing & Limits:
- Hard Limit: Restricts usage beyond your set threshold.
- Soft Limit: Sends you an email alert once the threshold is met.
Functionality Limitations
Auto-GPT’s capabilities, as depicted in its source code, come with certain boundaries. Its problem-solving strategies are governed by its intrinsic functions and the accessibility provided by GPT-4’s API. For in-depth discussions and possible workarounds, consider visiting: Auto-GPT Discussion.
AI’s Impact on the Labor Market
The dynamic between AI and labor markets is ever-evolving and is documented extensively in this research paper. A key takeaway is that while technological progress often benefits skilled workers, it poses risks to those engaged in routine tasks. As a matter of fact, technological advancements might displace certain tasks but simultaneously pave the way for diverse, labor-intensive tasks.

An estimated 80% of American workers might find that LLMs (Language Learning Models) influence around 10% of their day-to-day tasks. This statistic underlines the merging of AI and human roles.
AI’s dual-faceted role in the workforce:
- Positive Aspects: AI can automate plenty of tasks, from customer service to financial advice, granting a reprieve to small enterprises that lack funds for dedicated teams.
- Concerns: The boon of automation raises eyebrows about potential job losses, particularly in sectors where human involvement is paramount, such as customer support. Along with this is the ethical maze tied to AI accessing confidential data. This calls for a strong infrastructure ensuring transparency, accountability, and ethical use of AI.
Conclusion
Clearly, tools such as ChatGPT, Auto-GPT, and GPT-Engineer stand at the forefront of reshaping the interaction between technology and its users. With roots in open-source movements, these AI agents manifest the possibilities of machine autonomy, streamlining tasks from scheduling to software development.
As we propel into a future where AI integrates deeper into our daily routines, a balance between embracing AI’s capabilities and safeguarding human roles becomes pivotal. On the broader spectrum, the AI-labor market dynamic paints a dual image of growth opportunities and challenges, demanding a conscious integration of tech ethics and transparency.


