AI Tools 101
Banani AI Review: This Text-to-UI Tool Is Scary Fast
Unite.AI is committed to rigorous editorial standards. We may receive compensation when you click on links to products we review. Please view our affiliate disclosure.

As someone who learned Sketch back in design school, I remember how long it took to build even a simple wireframe from scratch. Doing UX/UI manually took hours, and a single layout iteration meant redoing multiple screens.
That’s why I was excited to try Banani AI. It’s a tool that promises to turn text prompts into polished, multi-screen UI designs in minutes. After trying it for myself, I was impressed by how quickly I generated professional designs that could then effortlessly be refined in Figma.
In this Banani review, I’ll discuss the pros and cons, what it is, who it’s best for, and its key features. Then, I’ll show you how I used it to design a fitness app in minutes.
I’ll finish the article by comparing Banani with my top three alternatives (UX Pilot, Uizard, and Google Stitch). By the end, you’ll know if it’s the right tool for you!
Verdict
Banani is a quick and simple way to turn text into clean UI designs for dashboards, landing pages, and mobile apps. It works best for early-stage ideas and Figma handoff, but not for complex or highly original designs.
Pros and Cons
- Generates designs very quickly from text
- No design skills are required
- Strong Figma integration for easy handoff
- Supports brand colors and design styles
- Great for dashboards, landing pages, and mobile app design
- Designs consistently look clean and professional
- Not great for unique or complex interfaces
- The designs may lack originality
- Still needs review for UX and accessibility
- Best for early stages, not the final product
- Results depend on prompt quality
What is Banani?
Banani is an AI design tool that generates UI wireframes with multiple screens. It converts Natural Language Prompts into editable designs. It also understands design systems and brand styles, and supports customization via text feedback.
One of the things I love most about Banani is how it integrates with Figma. You can easily move your designs from Banani into a professional setting for more in-depth refinement.
Core Promise
Banani’s core promise is that you can create beautiful, user-friendly designs ridiculously quickly without years of design experience. That means mockups and prototypes that used to take hours are now getting done in minutes.
Banani vs. Alternatives
It’s no secret that the AI design tool market is currently crowded (Uizard, Mockitt, and Designs.ai, to name a few). But what makes Banani stand out is its speed and simplicity without sacrificing quality.
Key Differentiator
The key differentiator is that when using Banani, you don’t need to understand complex design systems. Instead, you describe what you want in plain English (e.g., “a landing page for a fitness app with pricing”) and it generates a wireframe in seconds that looks professional and is usable. You can then share it or export it to Figma for further refinement.
The “10x Designer” Claim
Banani claims their software is like a “10x designer.” What Banani means by this isn’t that you’ll suddenly be as good as a senior designer with 10 years of experience.
What they mean is you’ll be 10 times more productive in the early stages of design (like wireframing, prototyping, and exploring different layouts). You’re basically going from zero to “this could work” much faster than traditional methods.
However, Banani may not be the best option for overly complex, custom designs. It’s better for common UI patterns (like dashboards, landing pages, and mobile apps). If you’re trying to create something more unique and artistic, traditional design tools are probably still your best bet.
Who is Banani Best For?
Here’s who Banani is best for:
- Product managers can use Banani for quick wireframes and idea validation.
- Startup founders can use Banani to quickly turn ideas into visuals.
- Developers can use Banani for UI designs without the heavy work.
- UI and UX designers can use Banani to speed up ideation and layout exploration.
- Design agencies can use Banani to scale client design work.
- Beginners and students can use Banani to learn UI with AI help.
Banani Key Features
Here are Banani’s key features:
- Text-to-Prototype Generation: Generate UI prototypes with multiple screens using text prompts.
- Interactive Editing: Designs can be edited with prompts, with full control over colors and fonts.
- Figma Integration: Designs can be imported and exported directly to Figma.
- Collaboration Tools: Real-time collaboration features where teams can easily share designs via links.
- Free Templates: A library of pre-built templates with different themes for instant stylization.
- AI Models: Different AI models to choose from, including Gemini 3 Pro and GPT-5.1.
- Design Flexibility: Effortlessly generate and edit designs for web or mobile using AI.
- Code Handoff: Designs can be exported to HTML/CSS or image formats for handoff to developers.
How to Use Banani
Here’s how I used Banani AI to design a fitness app:
- Sign Up for Banani
- Explore the Interface
- Give Banani a Prompt
- Improve the Prompt
- Generate the Design
- Explore the Canvas
- Edit with AI
- Add the Next Screen
- Generate the Next Screen
- Describe the Next Screen
- Preview, Export, Share
Step 1: Sign Up for Banani

I started by going to banani.co and selecting “Get started free.”
Step 2: Explore the Interface

After creating an account and answering a few questions, I was taken to the design generator. In the center, all I had to do was describe the design I wanted to create.

I could attach files for reference, switch between mobile and web design, choose my model (the best one for the task, GPT-5.1, or Gemini 3 Pro), and choose a theme (either a new one or one of the presets).

Below the generator were some examples I could explore, along with a helpful video tutorial.
Step 3: Give Banani a Prompt

Here’s the prompt I came up with and added to the empty field:
“Design a mobile UI for a fitness app made for busy professionals. Keep the layout simple and focused. Use clean cards with quick-glance data. Add a progress ring, a daily checklist, and a session timer. Use calm neutrals with one energetic accent. Show a dashboard, a workout detail screen, and a habit panel.”
I kept everything on default, made sure “Mobile” (not “Web”) was selected, and hit “Generate.”
Step 4: Improve the Prompt

Immediately, Banani got to work improving my prompt. I could make any edits I wanted, but I kept everything as it was and hit “Generate.”
Step 5: Generate the Design

Banani started generating my mobile app, which only took about a minute or two. Looking at the prompt I gave it, the result was pretty spot on! It also looked really clean and modern.
Step 6: Explore the Canvas

On the left was the screen I had just generated, and the option to add more screens. Below that, I could change the theme color or individual colors exactly how I wanted. This is great if you want to apply exact branding colors to your designs.

Above the design were some options to duplicate the screen, copy to Figma, or copy HTML/CSS. The direct Figma integration is really useful, allowing me to jump straight into refining my design with more direct control.

At the bottom, I could type to edit on the screen.
Step 7: Edit with AI

I was most curious about editing with AI, so I gave it this prompt:
“Change the progress ring to an electric blue accent. Update the daily checklist to use pill-shaped tasks with clear check marks. Keep the rest of the layout simple and focused.”

Immediately, Banani got to work. A few seconds later, my edits appeared in the design. I was impressed by how professional the results looked.
Step 8: Add the Next Screen

Adding a new screen was as easy as selecting the “New Screen” button in the left panel and describing what you want to create.
Step 9: Generate the Next Screen

However, my favorite way to generate a new screen was by selecting the elements on the existing screen and getting Banani to automatically generate a fully designed layout that matched the style and structure of the original. I selected the progress ring to see what it would generate.
Step 10: Describe the Next Screen
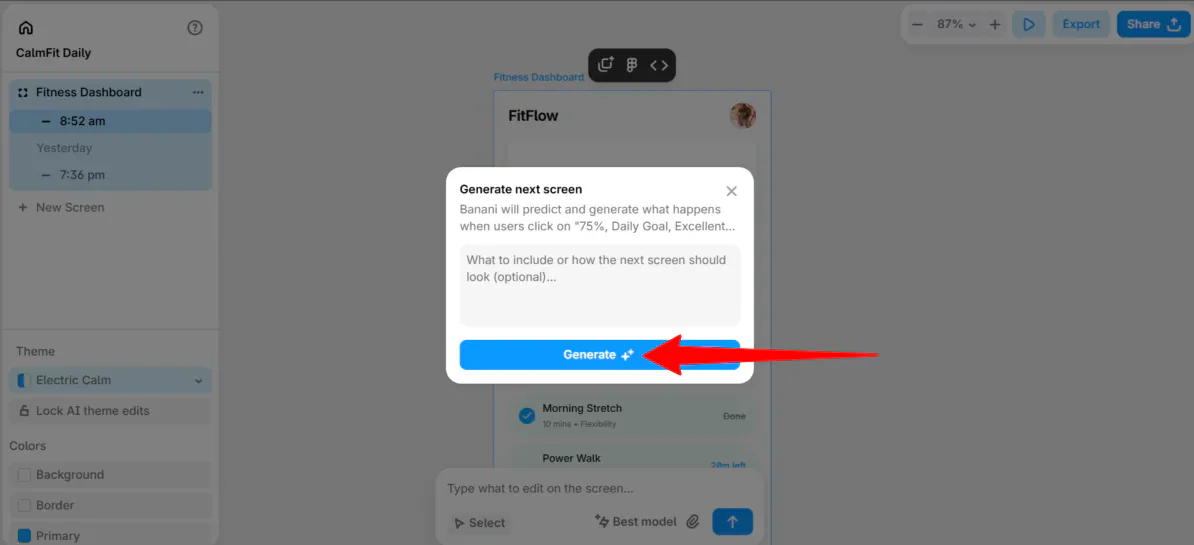
A small window appeared, where I described what the next screen should look like. This was optional, so I hit “Generate.”

Banani got to work generating the screen that would appear if people selected the progress ring. It came out looking great, with a clean layout and a professional finish.
Step 11: Preview, Export, Share

Once I was happy with everything, I could play a prototype, export the screens as PNG, SVG, or JPG, and share the project or link with my team.
Overall, Banani made designing my fitness app effortless. It turned my text prompts into professional screens in minutes.
Top 3 Banani Alternatives
Here are the best Banani alternatives.
UX Pilot
The first Banani alternative I’d recommend is UX Pilot. UX Pilot uses AI to accelerate UX and UI design. Teams can create wireframes and entire user flows in seconds with Figma integration for easy handoff.
On the one hand, UX Pilot stands out with its UX features, like AI-generated screen flows and UX frameworks. Meanwhile, Banani is simpler and more focused on quickly generating professional multiple-screen flows from text prompts with strong Figma support.
For AI-assisted UX design with full workflow support, choose UX Pilot. For fast, easy screen generation from prompts, choose Banani.
Read my UX Pilot review or visit UX Pilot!
Uizard
The next Banani alternative I’d recommend is Uizard. Uizard lets product teams quickly turn ideas into editable wireframes and prototypes with AI.
On the one hand, Uizard stands out with features like screenshot and wireframe scanning, automatic theme generation, and an AI “Autodesigner.” Meanwhile, Banani focuses on generating professional designs with excellent Figma integration and brand style support.
Choose Uizard for AI prototyping, real-time collaboration, and turning sketches or screenshots into editable designs. Otherwise, choose Banani for fast, clean UI designs that integrate effortlessly with Figma.
Google Stitch

The final Banani alternative I’d recommend is Google Stitch. Google Stitch quickly turns text prompts into UI designs, wireframes, and prototypes.
On the one hand, Stitch stands out with its easy editing, code export to HTML, and the ability to build with Google Gemini. Meanwhile, Banani is great at creating polished multi-screen prototypes, seamlessly integrating with Figma, and consistent branding across designs.
For quickly and effortlessly generating professional UI designs with Figma handoff, choose Banani. For easy editing, code export, and building with Google Gemini, choose Google Stitch.
Banani Review: The Right Tool For You?
Overall, my experience with Banani was incredibly smooth and effortless. I turned a simple text prompt into a minimalistic UI design in minutes. I was impressed by how fast Banani was and how professional the results were.
The Figma integration really stood out, making it easy to refine designs on a professional platform without losing quality. Banani proved to be the perfect solution for initial wireframing, rapid prototyping, and detailed refinements via Figma.
However, Banani won’t be for everyone. If that’s the case, here are the best Banani alternatives worth considering:
- UX Pilot is best for teams wanting to supercharge their UX workflow with AI and seamlessly hand off designs in Figma.
- Uizard is best for product teams who want AI prototyping, real-time collaboration, or the ability to turn sketches/screenshots into editable designs.
- Google Stitch is best for designers looking for easy editing, code export, and integration with Google Gemini.
Thanks for reading my Banani review! I hope you found it helpful. Try Banani for free and see how you like it!
Frequently Asked Questions
What is Banani AI?
Banani AI is a design tool that lets you generate, edit, and export UI designs with simple text prompts.
Is there a free AI designer?
Yes, there are many free AI designers, including Banani AI.
Which AI is best for UX design?
There is no single “best” AI for UX design, as it depends on the task. The best UX design platforms I’d recommend are Banani AI, UX Pilot, Uizard, and Google Stitch.


