AI Tools 101
AgentKit by OpenAI Review: Is This the End of N8N?
Unite.AI is committed to rigorous editorial standards. We may receive compensation when you click on links to products we review. Please view our affiliate disclosure.

Have you ever wished you could build your own ChatGPT-powered assistant? One that actually does things for you instead of just replying with text?
PwC’s 2025 survey found that 79% of senior executives say AI agents are already being adopted in their companies. But until recently, building those agents required juggling multiple tools, writing complex backend logic, and endlessly debugging APIs.
That’s where AgentKit by OpenAI comes in. It’s an all-in-one platform that lets anyone (developers and non-coders alike) design, test, and deploy AI agents fast.
In this AgentKit by OpenAI review, I’ll discuss the pros and cons, what it is, who it’s best for, and its key features. Then, I’ll show you how I used it to create a flight agent that creates itineraries and finds flight information.
I’ll finish the article by comparing AgentKit with my top three alternatives (N8N, Albato, and Pabbly). By the end, you’ll know if it’s right for you!
Verdict
AgentKit is a powerful platform that lets anyone design and deploy AI agents while keeping data secure and managed. However, workflows can get complex; it only works with OpenAI models, embedding needs backend setup, and advanced retrieval features are limited.
Pros and Cons
- Quickly design complex agent workflows with a drag-and-drop canvas
- Brings design, deployment, testing, and management together
- Flexible for all skill levels (developers can code, and non-coders can use the visual interface)
- Tools to keep data secure, compliant, and well-managed
- Optimization tools to boost accuracy and fine-tune models
- Use ChatKit to add branded chat agents to apps
- Every decision requires "if/else" nodes, making workflows large and complex
- Supports only OpenAI models, and the platform itself isn’t open source
- Embedding agents requires backend handling of API keys
- Lacks advanced retrieval tools
What is AgentKit by OpenAI?
AgentKit by OpenAI helps developers build and deploy AI agents quickly with visual tools. It brings everything (design, versioning, prompt tuning, and testing) into one platform to move agents from prototype to production.
Sam Altman, CEO of OpenAI, called it “everything you need to build, deploy, and optimize agent workflows with way less friction.
The Problem AgentKit Solves
The primary objective of AgentKit is to address this issue: eliminating fragmented tools and streamlining agent development workflows.
Before tools like AgentKit, you’d use one tool for orchestration, another for connecting to your data, a third one for testing, and then you’d have to build your own frontend from scratch. However, that approach doesn’t scale. AgentKit solves this issue.
AgentKit & Responses API
AgentKit is built on top of OpenAI’s Responses API, which they released in March 2025. If you’ve been using that, you already have a foundation to work with.
But even if you haven’t touched it, AgentKit makes everything more accessible because it sits on top of that infrastructure.
AgentKit vs. ChatGPT
But what makes an “agent” different from just using ChatGPT? I like to think of AgentKit as “ChatGPT with hands.”
Regular ChatGPT responds to you with text. An agent can actually perform actions. It can pull data from your Google Drive, update your spreadsheet, send an email, or perform any other task you program it to do. That’s the game changer.
Visual-First Approach & Code-First Flexibility
AgentKit doesn’t force you into one way of building. Some people love visual interfaces with drag-and-drop functionality. Other people prefer writing actual code.
AgentKit gives you both options, which is rare. The Agent Builder is a visual canvas that designs workflows without code. But if you want to build in Node, Python, or TypeScript, you can do that too.
The visual approach is powerful for complex workflows because of how everything connects. You can then code the parts that need more customization if needed.
The flexibility is what makes AgentKit actually useful. OpenAI’s AgentKit is their attempt to consolidate a fragmented developer landscape into something that actually works together smoothly.
Who is AgentKit Best For?
Here’s who AgentKit is best for:
- Developers can use AgentKit to build, test, and deploy AI agents in Python, TypeScript, or Node.js.
- Engineering teams can use AgentKit to build and manage multi-agent systems quickly.
- Product managers can use AgentKit to set agent behavior, rules, and coordinate with engineers.
- Enterprises can use AgentKit to manage data access, security, and tool integrations like Google Drive and CRMs.
- IT teams can use AgentKit to deploy agents at scale, add them to apps with ChatKit, and monitor performance with Evals.
- Legal teams can use AgentKit to stay compliant with rules and company policies using audit trails, versioning, and policy tools.
- Hobbyists can use AgentKit to build agents with drag-and-drop tools and customize them further using the SDK.
AgentKit Key Features
Here are AgentKit’s key features:
- Agent Builder: A visual drag-and-drop canvas to design multi-agent workflows.
- Connector Registry: Central admin panel to manage connections to tools like Google Drive, Dropbox, and CRM.
- ChatKit: Embed customizable chat-based agents into apps or websites.
- Agents SDK: Development in Python, TypeScript, or Node.js for full control over agent logic.
- Evals: Tools to measure performance like trace grading, datasets, and automated prompt optimization.
- Guardrails: Open-source safety layer to detect PII and jailbreaks.
- Reinforcement Fine-Tuning (RFT): Customize models like o4-mini and GPT-5 with custom graders.
How to Use AgentKit
Here’s how I used AgentKit by OpenAI to create a flight agent that creates itineraries and finds flight information:
- Sign Up for the Agent Builder
- Add a Payment Method
- Buy Credits
- Access the Agent Builder
- Create a New Workflow
- Create a Classifier Node
- Choose the Output Format
- Add Properties
- Add an “If/else” Node
- Add a Flight Agent Node
- Add an Itinerary Agent Node
- Preview & Test
- Create & Download a Widget
- Upload the Widget
- Deploy the AI Agent
Step 1: Sign Up for the Agent Builder

I started by going to platform.openai.com/agent-builder and signing up.
Step 2: Add a Payment Method

Before getting started, you’ll need to add a payment method. The platform works on a credit system, where credits are consumed as the API is used.
Step 3: Buy Credits

You can choose how many credits you want to have at what cost.
For just $5, you get about 2 million output tokens. That’s more than enough to get started, and the option I chose.
Step 4: Access the Agent Builder

After paying for my credits, I was taken to the Overview section on OpenAI. I selected “Design” under “Build with AgentKit.”

Next, I selected “Open Agent Builder.”
Step 5: Create a New Workflow

OpenAI presented six different workflow templates I could use:
- Data enrichment: Gather data to answer questions.
- Planning helper: Create work plans.
- Customer service: Handle customer questions with custom policies.
- Structured data Q/A: Ask databases questions.
- Document comparison: Compare differences between uploaded documents.
- Internal knowledge assistant: Respond to employee questions.
While these were good starting points, I decided to start from scratch by selecting “Create.”

Immediately, I was brought to a new workflow with a Start node to set input and state variables connected to an agent model. Every new workflow starts with these nodes.
In this AgentKit guide, I’ll show how to build a travel agent that creates itineraries and looks up flight information, inspired by Christina Huang’s example from OpenAI.
Step 6: Create a Classifier Node

I will create two agents: an itinerary agent and a flight agent. That meant I had to turn the first agent into a classifier to determine whether the incoming message is about an itinerary or a flight.
To do this, I selected the “My agent” node and changed the name to “Classifier.” Next, I gave it instructions with a description:
“You are a helpful travel assistant for classifying whether a message is about an itinerary or a flight.”
Step 7: Choose the Output Format

Next, I changed the output format from text to “JSON” and selected “Add schema.”
Step 8: Add Properties

This opened a new window, where I added a property called “classification” with two options: “flight_info” and “itinerary.”
Step 9: Add an “If/else” Node

Next, I added an “if/else” node to branch based on the classification. I clicked and dragged from the classification node to create a new node and selected the “If/else” node from the left panel.

I selected the node and added “input.output_parsed.classification == “flight_info”” to “If.”
Step 10: Add a Flight Agent Node

From this flight agent, I clicked and dragged to add another new node and selected “Agent” from the left panel.

I named it “Flight Agent” and gave it the following instructions: “You are a travel assistant. Recommend a flight to go to. Use airport codes.”
I also made sure to give it “Websearch” as a tool to get the most up-to-date information about flights.
Step 11: Add an Itinerary Agent Node

For the itinerary agent, I did the same thing: added an Agent node and connected it to “Else,” named it “Itinerary Agent,” and gave it the following instructions: “You are a travel assistant. Build a concise itinerary.”
Step 12: Preview & Test

To preview and test what I’ve created (by selecting “Preview” on the top right), I’d have to verify my organization. The preview allows me to send messages to my workflow to complete tasks in a chatbot-like interface (like asking what I should do in a specific place, in this case).
Step 13: Create & Download a Widget
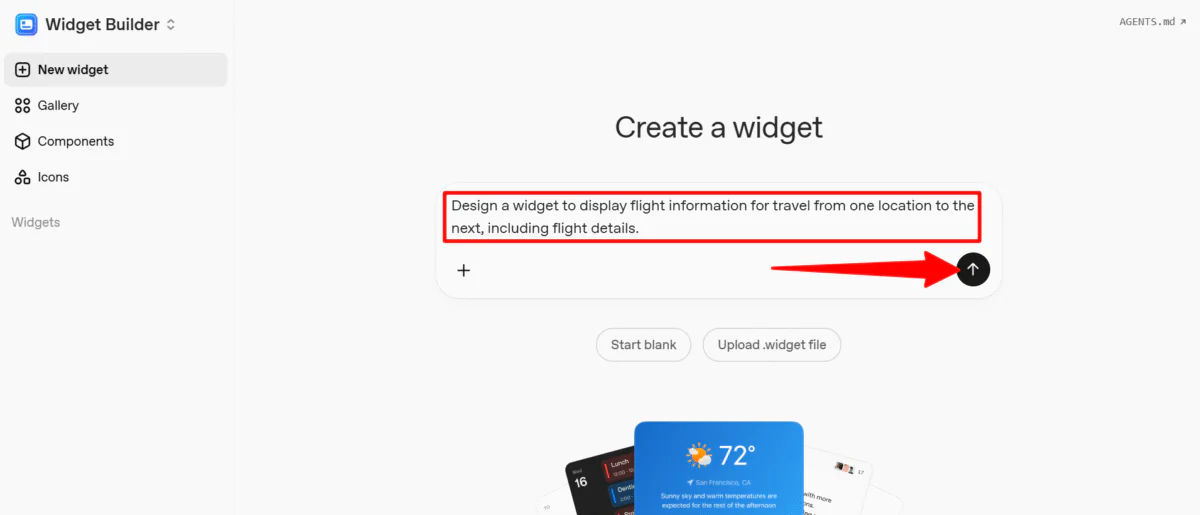
To make the results more engaging and visual, I used the Widget Builder. I easily created a new widget by describing it or uploading a .widget file.
I decided to describe my widget, so I gave it the following description: “Design a widget to display flight information for travel from one location to the next, including flight details.”
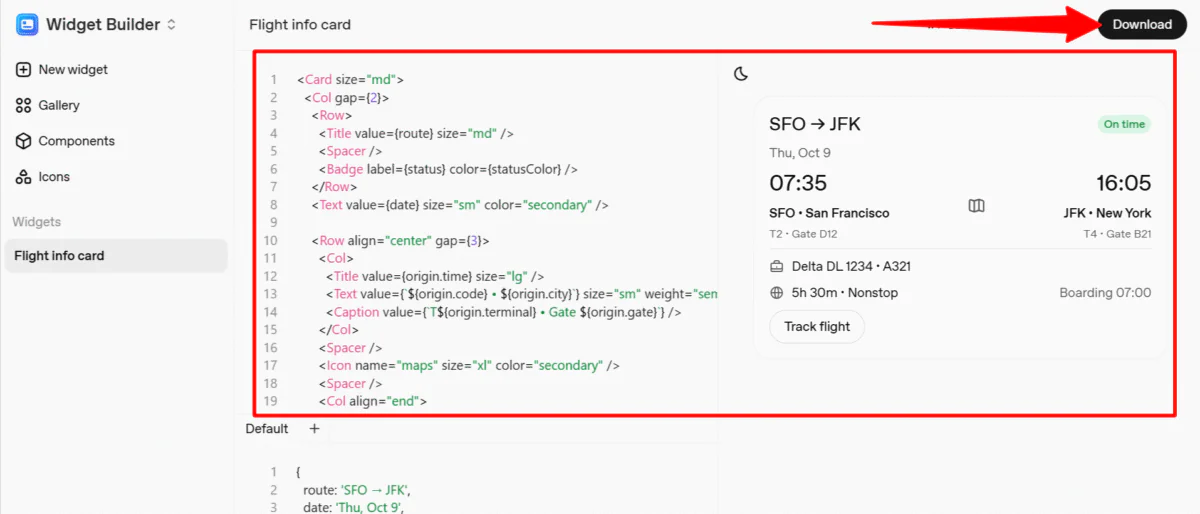
Immediately, the Widget Builder began generating my widget. It didn’t take long, and before I knew it, I was presented with the code along with a preview of the widget.
I hit “Download” on the top right to download the template.
Step 14: Upload the Widget

In my workflow, I selected the “Flight Agent” node and chose the “Widget” output format to upload the file. Now, when previewing my workflow, a visual flight information card will be displayed.
Step 15: Deploy the AI Agent

Once I was happy with everything, I hit “Publish” on the top right. All I had to do was name the workflow to deploy the AI agent.
Once published, I had access to the Agents SDK or the Workflow ID to add it directly to my product.
Overall, AgentKit made it easy to build a functional travel agent from scratch. While you need some developer knowledge, I liked how quickly I could connect agents and even design a widget to make the experience more interactive.
Top 3 AgentKit Alternatives
Here are the best AgentKit alternatives I’ve tried that are worth considering:
N8N
The first AgentKit alternative I’d recommend is N8N. It’s AgentKit’s biggest competitor, offering over 500 integrations and strong workflow automation tools for building multi-step processes.
N8N stands out for being open-source, whereas AgentKit (as a platform) is not. N8N supports many third-party apps and models (such as OpenAI, Anthropic, and self-hosted LLMs) for full backend customization. It offers freedom from vendor lock-in and supports both frontend and backend automation.
Meanwhile, AgentKit is tightly linked to OpenAI. It offers polished chat widgets and prompt optimization tools, but only supports OpenAI models and has limited external integrations.
For a wide variety of integrations and open deployment, choose N8N. For sleek chat interfaces and smooth OpenAI integration, choose AgentKit.
Read my N8N review or visit N8N!
Albato

The next AgentKit alternative I’d recommend is Albato. It’s a no-code automation tool that connects over 1,000 apps like Google Sheets, Slack, Shopify, and HubSpot. That means you can automate workflows without coding.
Albato stands out with its rule-based automation that connects apps to sync data, send alerts, or update records. It offers an easy drag-and-drop builder, real-time syncing (up to every minute on Enterprise), and support for custom APIs and webhooks.
Meanwhile, AgentKit by OpenAI focuses on AI agent development. It provides tools like Agent Builder, ChatKit, and the Agents SDK to build LLM-powered agents.
Choose Albato for simple, high-volume app automation that’s easy and cost-effective. For multi-agent workflows using a visual builder, choose AgentKit.
Pabbly
The final AgentKit alternative I’d recommend is Pabbly. It’s an affordable automation platform that connects to 1,000+ apps and creates complex workflows. It’s great for small businesses and marketers.
Pabbly stands out with its lifetime deal, so you pay once and use it forever. It also offers unlimited tasks for workflows and enterprise-grade security with SOC2 Type 2 and ISO 27001 certifications.
Meanwhile, AgentKit is great at managing multiple agents and keeping clear records. It’s a good choice for developers building agents with GPT-5, or o4-mini.
Choose Pabbly for affordable, scalable, and secure no-code automation with long-term savings. Otherwise, choose AgentKit for strong OpenAI integration.
AgentKit by OpenAI Review: The Right Tool For You?
After spending time building with AgentKit, it lives up to its goal: bringing everything you need to build, test, and deploy AI agents into one smooth workflow. I liked how quickly I could turn an idea into a working prototype with the visual builder and customize logic with the SDK.
However, AgentKit works best if you’re already invested in the OpenAI ecosystem. For more flexibility and integrations, you might want to consider these alternatives:
- N8N is best for developers and teams who want open-source flexibility, full backend control, and hundreds of third-party integrations.
- Albato is best for those who want no-code app automation with easy drag-and-drop setup and real-time syncing.
- Pabbly is best for small businesses or marketers looking for an affordable, lifetime-deal automation platform with unlimited workflows.
Thanks for reading my AgentKit by OpenAI review! I hope you found it helpful.
AgentKit works on a credit system, so you can choose how many credits you want to purchase. Try it for yourself and see how you like it!


